How To Create and Manage WordPress User Roles and Permissions
Collaboration with a team in running a website needs one to familiarize with the different user roles and permissions available. It’s crucial to manage user roles and understand what permissions each is granted under this WordPress feature.
What Are WordPress User Roles?
WordPress user roles are a simple concept used to manage what actions (called Capabilities) every user is able to perform through the WordPress dashboard. Every role is organized by a webmaster — who is automatically assigned as an administrator when installing WordPress.
There are six default WordPress roles you can give to your users – administrator, editor, author, contributor, subscriber, and super admin.
No matter what kind of website you operate, user role management is an absolute must. For example:
Secure access – you can easily limit who can and cannot access or perform administration tasks, like installing updates, themes, plugins, or tweaking your site’s PHP code.
Controlled workflow – allows users to focus on their personal tasks, and prevent overlapping duties among them.
6 WordPress User Permission Roles
Let’s break down these permissions for every user role in more detail:
|
Permission |
Administrator |
Editor |
Author |
Contributor |
Subscriber |
|
Posts |
Full control |
Full control |
Add, edit, publish, delete own |
Add, edit, delete own |
No control |
|
Pages |
Full control |
Full control |
No control |
No control |
No control |
|
Upload files |
Full control |
Full control |
Full control |
No control |
No control |
|
Moderate comments |
Full control |
Full control |
No control |
No control |
No control |
|
Plugins |
Full control |
No control |
No control |
No control |
No control |
|
Themes |
Full control |
No control |
No control |
No control |
No control |
|
Users |
Full control |
Edit own |
Edit own |
Edit own |
Edit own |
|
Settings |
Full control |
No control |
No control |
No control |
No control |
Administrator
Administrator has full control over every aspect of the website. They can add, edit, and delete plugins, as well as shape how the website looks. They also have access to the site’s settings and content management, including posts, pages, and comments.
Additionally, an administrator is the only role that can manage other user roles. Thus, if you are an administrator yourself, you can add new users, delete existing ones, or change their WordPress roles.
Editor
Editors can manage comments, pages, and posts (including those created by other users). However, they have no access to the settings panel, installing new plugins, customizing the site’s theme, or organizing other users.
Author
Unlike editors, authors’ role is limited to their own content management. That’s why they have no permission to organize other users’ posts, approve and delete comments, nor manage pages. Other than that, they have the same limited WordPress roles and permissions as the editors.
Contributor
The contributor role in WordPress allows users to add, edit, and delete their own content. Contributors can’t publish, upload media files, and manage their posts once published.
Subscriber
Subscribers only have access to view published posts or comments and manage their profile section on the dashboard.
Super Admin
A super admin role (which only applies to WordPress multisite network) can perform any administration task within the network, such as add or delete websites, install a plugin or theme, organize content and its settings. They have full control over the network’s users.
Picking the Right WordPress User Role
Before choosing the appropriate role for users, ask yourself about these key points: Will you let users manage your WordPress dashboard? Do you trust them to organize your site’s content? Should you review their posts before publishing? Are they capable enough to edit and publish other users’ posts?
Note: Be cautious when appointing another user as a new administrator. Once assigned, they get full access to your admin panel. They can even edit or delete your account.
Managing WordPress Users
Next, let’s figure out the correct way to add, delete, and customize user roles on your site.
Things to Know Before Setting WordPress User Roles
Here are a couple of key points to grasp before setting up user roles:
- An administrator can change user roles at any time from the Users menu.
- Once assigned, your new users will receive an email containing their login credentials.
- Some user roles might have slight capability differences, especially content creator roles (author and contributor). Understand how each role differs from one another before appointing anyone.
- Users with No role for this site can only log in to your dashboard but have no permission to access any page.
- A super admin can perform local administrator’s tasks like updating WordPress itself, managing themes, users, and plugins.
Adding a New User
Follow these steps to create and assign a new WordPress user role:
- Log in to your WordPress Dashboard -> Users -> Add New.
- Fill out the form with the user’s personal details.
- Create a new password by clicking the Show password It’s optional since the user can change the password after logging in.
- From the drop-down menu, choose the preferred role.
- Hit Add New User.
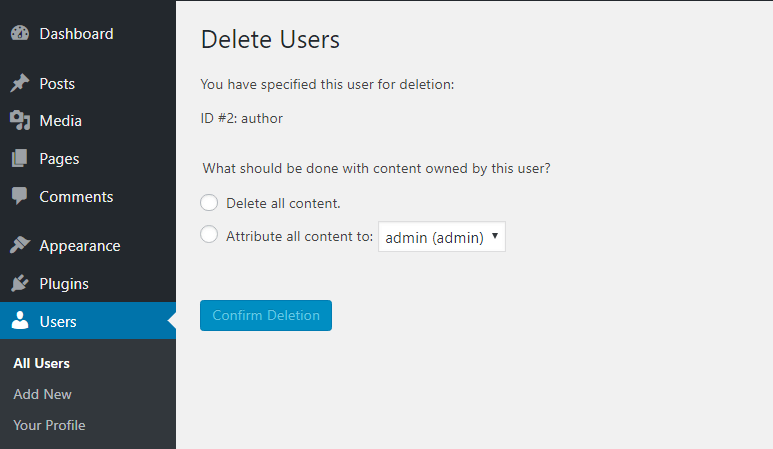
Deleting WordPress User
If you want to delete a user account:
Head to the Users menu on your WordPress dashboard -> All Users.
Click Delete next to the user’s name.
On the WordPress Delete Users page, press Confirm Deletion button. If users had any content on your website, you need to choose whether to delete or attribute their content to another user.
Alternatively, assign them to No role for this site to keep their posts and accounts on your website. Here are the steps:
- Select All Users from the Users
- Locate the user’s name ->
- In the Name section, choose No role for this site from the drop-down menu.
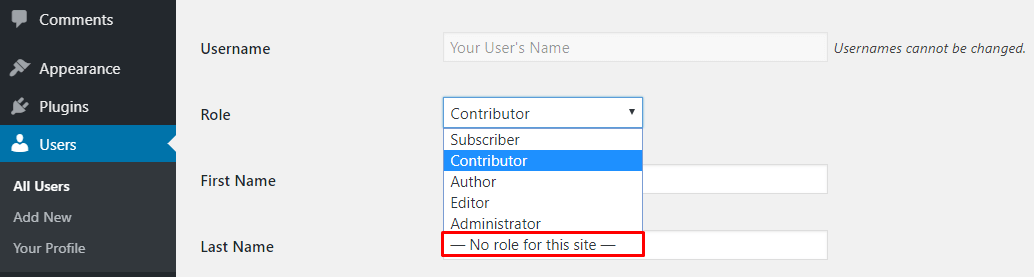
- Click Update User.
Customizing WordPress User Roles
It’s also possible to alter the roles and capabilities of a default user. In this tutorial, we will use the Capability Manager Enhanced plugin. This WordPress user management plugin allows you to edit or delete each role’s tasks, and you can even create a new role name, and its capability.
Let’s learn how to use this plugin:
- Install and activate the Capability Manager Enhanced from the Plugins
- As a precaution, create a backup before editing or deleting anything. Navigate to Tools -> Capability Managers.
- In the Backup and Restore section, select Backup roles and capabilities from the drop-down menu -> Do Action.
- Then, head to Users -> Capabilities.
- At the top right corner of the Roles and Capabilities page, click the drop-down menu to select the role and hit Load.

Tweak these settings to your preferences -> Save Changes


